Archive for the ‘Insulation’ Category

Leaky basement?

Wednesday, September 22nd, 2010

Why does my concrete basement leak? Most people do not realize how porous concrete really is. Air pockets, or tiny pores constitute 12 to 18% of the concrete mass. During the drying and curing process of a concrete pour, almost half of the water has to evaporate. As this moisture rises to the top of the slab, it creates channels of air that become a vast network for channeling water. In addition, water that collects behind concrete, whether under the floor or against the sidewalls, builds pressure until it drives through the surface into the home. Almost every house has an issue with moisture in the basement, even those built with the best of intentions. The older the house, the worse the situation is.

Moisture in home can cause BIG problems. The basement is the number one source for water infiltration into a home. High levels of humidity in the home can cause the growth of mold and mildew, encourage and facilitate rot and decay of structural members, increase condensation on doors and windows, cause floors to buckle and walls to crack, provide a thriving environment for insects like ants and termites, and cause irritation and allergic reactions that can trigger asthma, migraines, and other health problems for starters. Controlling the moisture in your home is a big deal.

To help keep your home safe, we can provide you with the following services:

  • install a working sump pump.
  • remove damaged, cracking, or buckling foundation walls and replace.
  • install drains in the slab or around footings.
  • waterproof the exterior of your basement walls and regrade and reseed your lawn.
  • inject a high-pressure epoxy or polyurethane solution into cracks.
  • insulate your basement with a closed cell foam product that is moisture resistant and does not allow the passage of water vapor.
  • install seamless gutters and downspouts on your home, including gutter guards and extensions.

Here are a few ideas for you to consider tackling if you have a problem with water in your basement:

  • check your gutters and downspouts. Inspect your eaves troughs to make sure they are not plugged with leaves and other debris, and make sure that the water coming down your downspout can get away from the edge of the house, preferably 4 to 6 feet away. If necessary, install extensions on your downspouts to direct water away from the foundation.
  • Watch out for shrubs and other plants that are too close to your foundation. Root systems from plants and larger shrubs can create pathways for water to flow against your foundation. Keep plants at least 12 inches away from the foundation.
  • Check your landscape for the proper fall. Ideally, there should be a minimum drop of 2 inches per foot as you move away from your house. Even if you capture all the water exiting your roof, surface water on your lawn can still flow toward your basement walls if the ground is not sloped correctly.
  • Seal the walls and slab in your basement with a penetrating sealer, such as RadonSeal. Any mold, mildew, salt, lime deposits, or efflorescence (white gritty staining) must be removed with a muriatic acid and elbow grease prior to the application of the sealer.
  • install a dehumidifier with a garden hose attachment and drain it into your sump pump.
  • Go to your local hardware store and buy a sump pump with a water pressure backup option

For more information on any of these services or a free quote, contact us today!

Designing for Insulation

Monday, March 1st, 2010


One of the most important steps in building a new home includes the insulation process.  In the past, simply erecting the frame of a home and then coming back and insulating the structure as it stands was the standard.  But today, higher utility bills and improved technology have given us the incentive and the possibility to improve our homes insulating performance dramatically. 

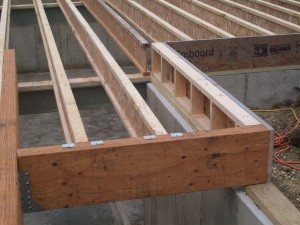
Knee Wall at Sill Location

Knee Wall at Sill Location

Insulation must be considered in the design process of a home if it is to be put to its maximum potential.  New home details such as cathedral ceilings, cantilevered floors systems, special nooks and so on that have become so popular with custom home building present new problems for insulation.

This picture is a perfect example.  Engineered floor systems are superior to dimensional framing because of their stability in temperature and humidity changes, longer span capabilities, and straighter and more uniform characteristics.  But they also pose a problem with insulation in one particular area:  along the box sill, or the area between the top of the floor system and the top of the foundation wall.  With a dimensional lumber (2×10, 2×12, etc.) floor system,  a joist is usually placed on the outside of the floor system (often called the rim joist), and then insulation can be applied to this joist on the inside of the house.  An enginered floor joist, or I joist,  is constructed differently.  The top and bottom of the joist are wider than the middle (web) portion.  If a joist is placed against the rim on the outside of the floor system, it creates an uninsulatable gap in which warm air will leave the home.  Instead of using an I  joist for this location, if a knee wall is constucted in its place it will allow the framing to remain load bearing, but yet leave a space for insulation to be applied.  After the framing is complete and the home is ready for insulation, the insulator can simply reach into the cavity and spray the entire wall with foam and thus achieve a completely sealed cavity and the homeowner does not have to worry about his hard earned cash slipping through the gaps in the floor and rushing into the cold winter air.

Little details like this can make a big difference in a home that will be in operation for years and years to come, whether it’s in the floor system, the construction of the corners and partitions, the attic and ventilation system, or any part of the house.  Our company prides itself on making small but smart decisions like this to benefit the homeowner long after the job is done and our contract is fulfilled.

Insulated Beams

Friday, February 26th, 2010
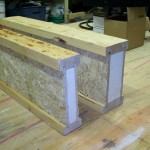
Insulated Beams for 4" and 6" walls

Insulated Beams for 4″ and 6″ walls

“Header” is carpenter lingo for any beam that transfers a load away from a door or window or any opening in a wall.  It can bear roof and/or floor weight.  Any opening on an outside wall of a home requires some degree of header.  Depending on what the load to be carried is, the beam needs to be strong enough to handle it.  In most cases a variety of dimensional lumber is used (2×10, 2×12. etc.) and is doubled up to carry the load.  Span tables and wood species properties must be taken into account to size the beam accordingly.

However, a couple of beams of solid wood do not have the best insulating qualities.  A new product on the market is both strong and smart.  An insulated header is engineered to provide the necessary bearing while not giving up the heat loss you get from dimensional lumber.  The beam is very similar to an I joist in design.  It has two webs to give it the ample strength to provide the bearing requirements, and it has block foam insulation to prevent heat loss.

We love using it because it is much lighter than dimensional lumber, is much more stable in humidity changes, and there is no lining up and adjusting that comes with matching up two pieces of lumber.

The header comes in both 3-1/2″  and 5-1/2″ widths for 4″ or 6″ wall applications.  This beam should not be used in place of major structural beams like Laminated Beams, but it can do everything a 2×12 can do.  We started using this product on both new construction and remodel projects because it enables us to build more efficiently to benefit the homeowner in the long term.